
Voice Changer|开源实时变音软件在WSL环境下的部署教程
VC Client是一款用于实时音频转换的客户端软件,它利用各种音频转换人工智能(VC,Voice Conversion)进行音频转换。支持的音频转换人工智能包括MMVC|So-Vits-SVC|RVC|DDSP-SVC等。
并且支持实时音频流输入输出,你可用来进行游戏变音。而且该软件几乎支持所有系统平台,下载对应的软件安装包即可。
前言
该项目文本站之前已经讲过,但是有人想知道如何使用Windows的WSL进行部署,所以这里单独出一篇关于Windows系统下WSL安装Linux部署开源项目的教程。
如果你希望下载之后开箱即用,免去这么麻烦的安装过程,可以直接前往下面的文章。
Voice Changer|开源免费实时变音软件游戏语音变调软件工具模型下载使用安装教程指南 – openAI
项目仓库
GitHub:https://github.com/w-okada/voice-changer
前置条件
在执行项目安装之前,我们需要先在Windows内安装WSL2以及虚拟机,关于如何安装WSL2虚拟机可参阅如下文章。
网络问题
在安装过程中,你可能即便开启了魔法上网也无法下载一些编程依赖库,关于魔法上网的相关配置问题不方便在站内讲解,请自行查看【魔法上网】的教程内容。
WSL环境配置教程
以下是关于如何配置Windows的WSL子系统下的Linux系统教程,根据步骤执行即可。
Linux安装Conda
我们需要先在Windows的WSL虚拟机Linux系统内安装Anaconda,为此我们需要先在CMD窗口中输入并执行wsl命令,使该CMD窗口进入到系统机内。
wsl
输入wsl之后,我们将会看到如下返回内容。
Microsoft Windows [版本 10.0.22621.1848]
(c) Microsoft Corporation。保留所有权利。

C:\Users\openA>wsl
openai_wiki@openAI:/mnt/c/Users/openA$
最后一行代表我们已经进入到了虚拟机,此时我们可以执行安装Anaconda的命令啦。
Anaconda官网地址:https://www.anaconda.com/download#downloads
在我们打开该网址之后,将会显示如下界面,我们直接鼠标右键选择最新的下载链接,然后点击复制链接按钮即可。
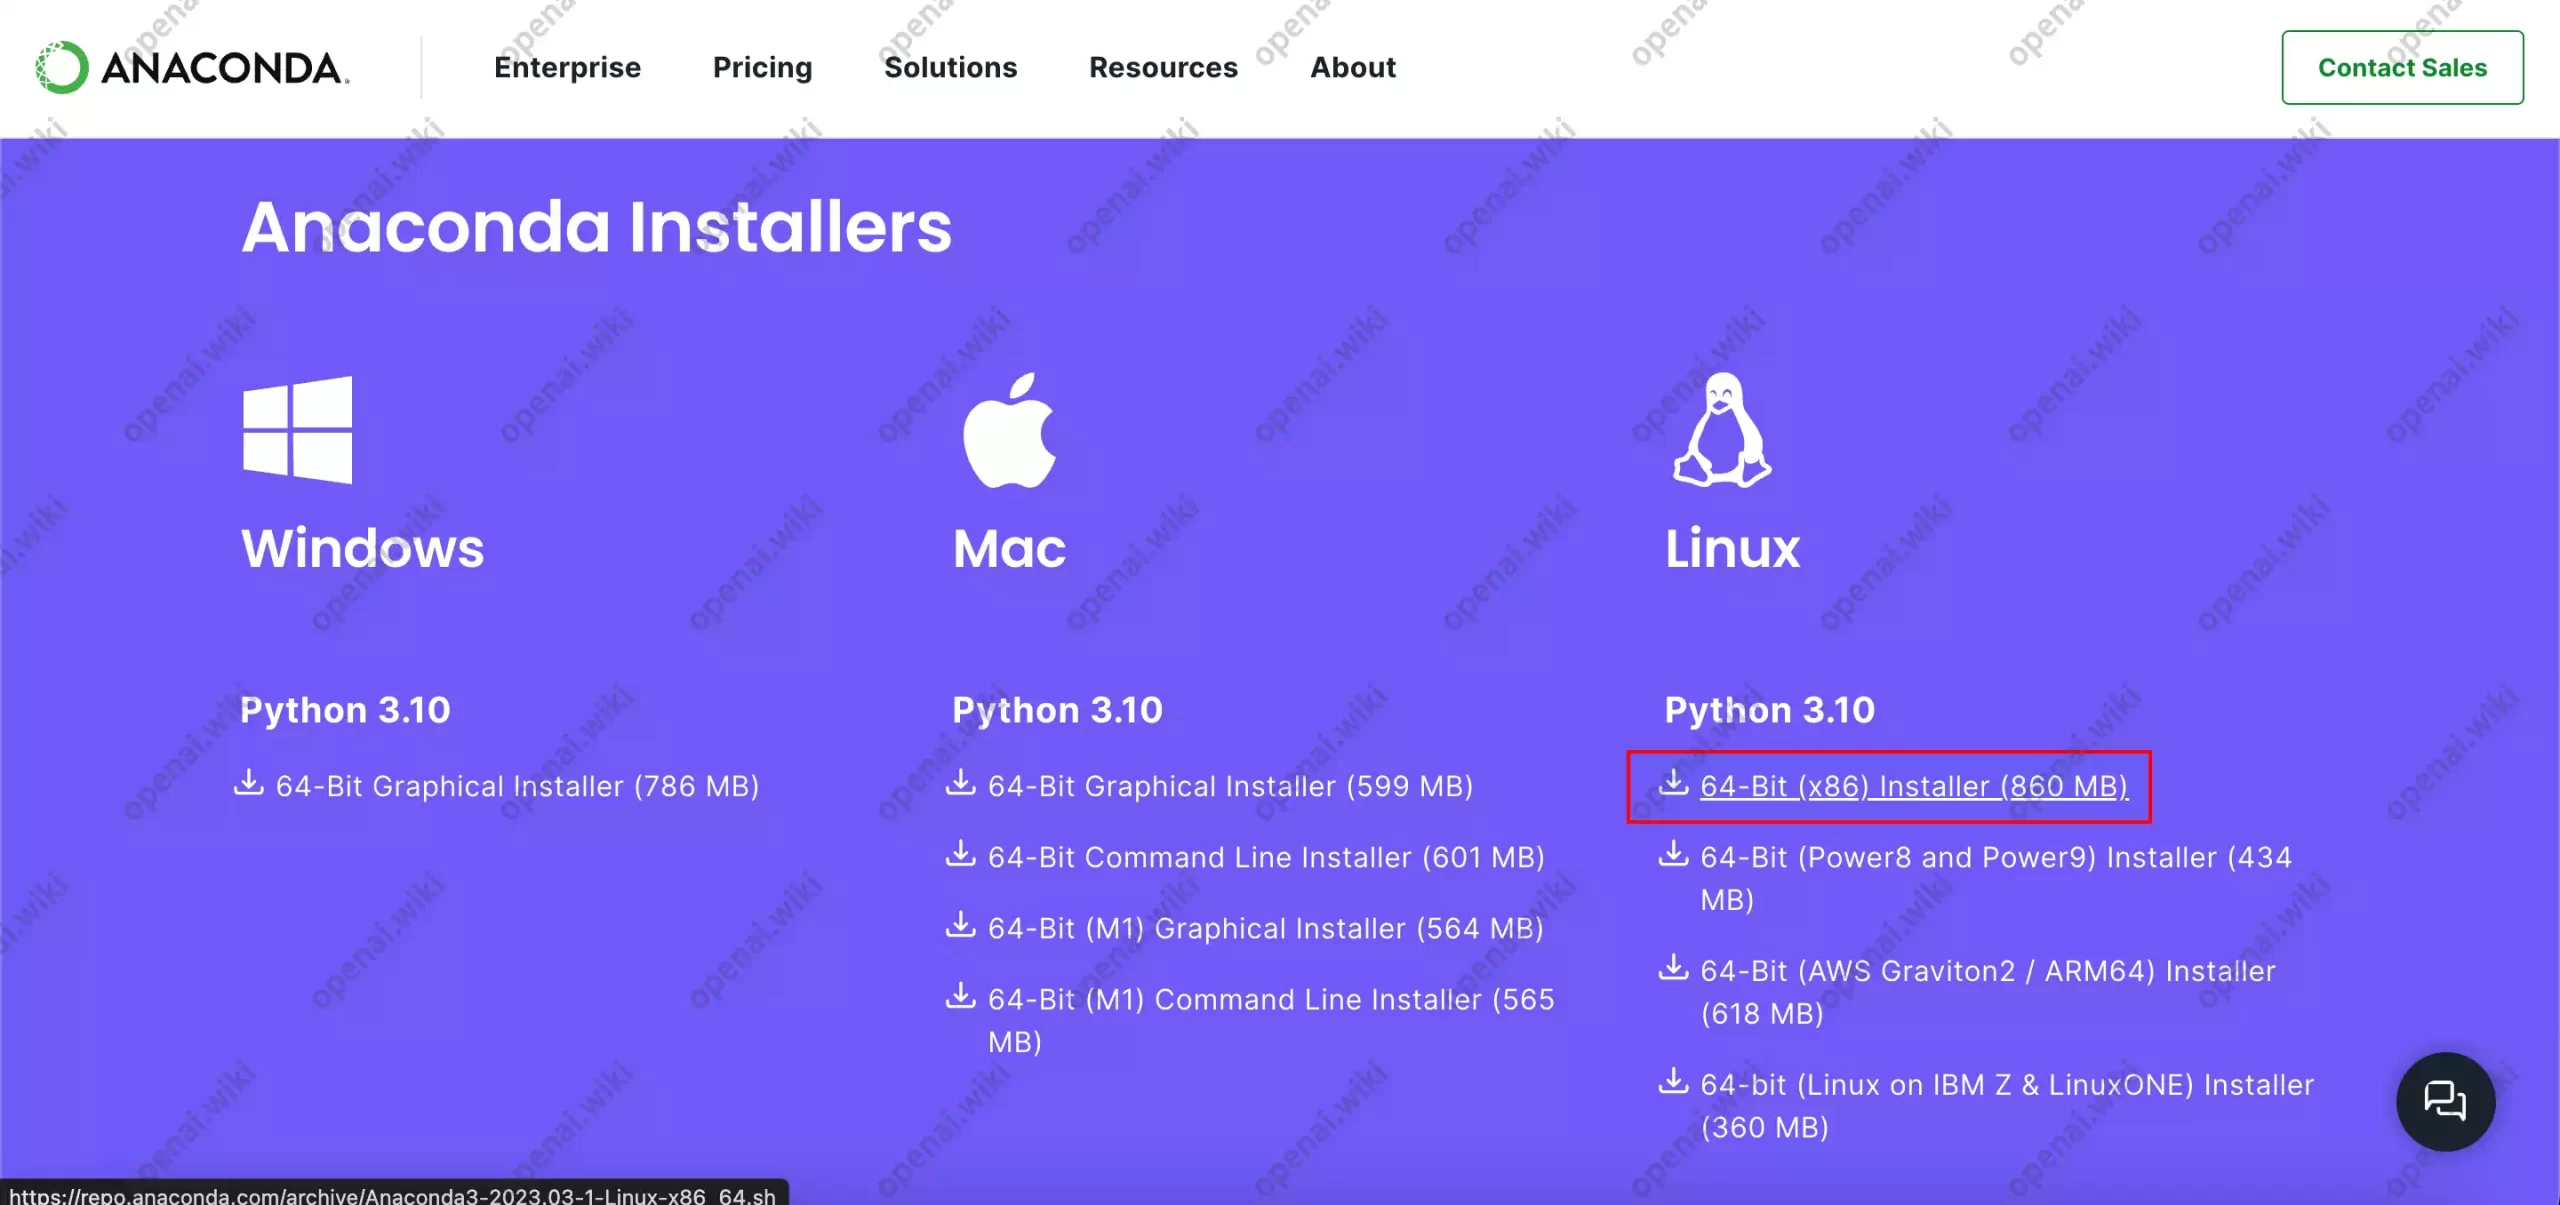
注意:是复制链接按钮!不是复制,也不是复制选中内容的链接,而是复制链接按钮。
此时我们已经得到了最新版Anaconda的下载链接,我们回到Linux终端内执行如下命令。
wget 复制的内容
比如本站得到的是:
wget https://repo.anaconda.com/archive/Anaconda3-2023.03-1-Linux-x86_64.sh
下面是执行该命令之后的过程回显,这代表已经开始下载啦,默默等待下载完成即可。
openai_wiki@openAI:/mnt/c/Users/openA$ wget https://repo.anaconda.com/archive/Anaconda3-2023.03-1-Linux-x86_64.sh
--2023-07-05 21:06:27--  https://repo.anaconda.com/archive/Anaconda3-2023.03-1-Linux-x86_64.sh
Resolving repo.anaconda.com (repo.anaconda.com)... 104.16.130.3, 104.16.131.3, 2606:4700::6810:8203, ...
Connecting to repo.anaconda.com (repo.anaconda.com)|104.16.130.3|:443... connected.
HTTP request sent, awaiting response... 200 OK
Length: 902411137 (861M) [application/x-sh]
Saving to: ‘Anaconda3-2023.03-1-Linux-x86_64.sh’

Anaconda3-2023.03-1-Linux-x86 31%[==============>                                   ] 271.87M  3.82MB/s    eta 2m 55s
等待片刻之后,待进度条至100%。
openai_wiki@openAI:/mnt/c/Users/openA$ wget https://repo.anaconda.com/archive/Anaconda3-2023.03-1-Linux-x86_64.sh
--2023-07-05 21:06:27--  https://repo.anaconda.com/archive/Anaconda3-2023.03-1-Linux-x86_64.sh
Resolving repo.anaconda.com (repo.anaconda.com)... 104.16.130.3, 104.16.131.3, 2606:4700::6810:8203, ...
Connecting to repo.anaconda.com (repo.anaconda.com)|104.16.130.3|:443... connected.
HTTP request sent, awaiting response... 200 OK
Length: 902411137 (861M) [application/x-sh]
Saving to: ‘Anaconda3-2023.03-1-Linux-x86_64.sh’

Anaconda3-2023.03-1-Linux-x86 100%[=================================================>] 860.61M  3.55MB/s    in 4m 18s

2023-07-05 21:10:47 (3.33 MB/s) - ‘Anaconda3-2023.03-1-Linux-x86_64.sh’ saved [902411137/902411137]

openai_wiki@openAI:/mnt/c/Users/openA$
此时我们已经下载完成了Miniconda的最新安装包,但只是将安装包下载到了Liunx系统的本地,我们还未对其进行安装 。
我们执行如下命令时,有一点需要注意,因为你下载的安装包可能名称与本站不一至,本站下载的安装包名称为Anaconda3-2023.03-1-Linux-x86_64.sh,而你所下载的可能是Anaconda3-2023.05-1-Linux-x86_64.sh或其它的,但无论如何,这个安装包的名称都将是Anaconda(注意大小写)开头的,所以我们先输入以下命令,但是别按回车键。
bash Anaconda
我们输入完上面的命令之后,按下键盘上的Tab键,系统将会自动补全安装包的名称。此时本站在终端内所显示的内容会变为bash Anaconda3-2023.03-1-Linux-x86_64.sh,我们按下回车键即可。
openai-wiki@openai-wiki:~$ bash Anaconda3-2023.03-1-Linux-x86_64.sh

Welcome to Anaconda3 py310_23.3.1-0

In order to continue the installation process, please review the license
agreement.
Please, press ENTER to continue
>>>
此时终端内会提醒我们需要阅读安装许可,我们直接按下回车键即可;按下回车键之后,将会看到如下内容。
agreement.
Please, press ENTER to continue
>>>
======================================
End User License Agreement - Anaconda
======================================

Copyright 2015-2023, Anaconda, Inc.

All rights reserved under the 3-clause BSD License:

This End User License Agreement (the "Agreement") is a legal agreement between y
ou and Anaconda, Inc. ("Anaconda") and governs your use of Miniconda.

Subject to the terms of this Agreement, Anaconda hereby grants you a non-exclusi
ve, non-transferable license to:

  * Install and use the Miniconda,
  * Modify and create derivative works of sample source code delivered in Minico
nda subject to the Terms of Service for the Repository (as defined hereinafter)
available at https://www.anaconda.com/terms-of-service, and
  * Redistribute code files in source (if provided to you by Anaconda as source)
 and binary forms, with or without modification subject to the requirements set
forth below.

Anaconda may, at its option, make available patches, workarounds or other update
--更多--
安装许可非常长,其实也没有必要阅读,所以这里就不翻译了。我们按下键盘上的q键,即可关闭阅读许可协议。
Do you accept the license terms? [yes|no]
[no] >>>
上面的提示为您接受许可条款吗? [是|否]。
默认按下回车后是no,这将无法安装。所以我们此时必须要手动输入yes,然后按下回车键。
Anaconda3 will now be installed into this location:
/home/openai-wiki/anaconda3

  - Press ENTER to confirm the location
  - Press CTRL-C to abort the installation
  - Or specify a different location below

[/home/openai-wiki/anaconda3] >>>
此时终端内提醒我们,现在默认安装位置为/home/openai-wiki/miniconda3,是否接受?我们直接按下回车键即可。
[/home/openai-wiki/anaconda3] >>>
PREFIX=/home/openai-wiki/anaconda3
Unpacking payload ...

Installing base environment...


Downloading and Extracting Packages


Downloading and Extracting Packages

Preparing transaction: done
Executing transaction: done
installation finished.
Do you wish the installer to initialize Anaconda3
by running conda init? [yes|no]
[no] >>>
此时我们已经安装完成了Anaconda,是否对其进行初始化?
我们输入yes,然后按下回车键。
by running conda init? [yes|no]
[no] >>> yes
no change     /home/openai-wiki/miniconda3/condabin/conda
no change     /home/openai-wiki/miniconda3/bin/conda
no change     /home/openai-wiki/miniconda3/bin/conda-env
no change     /home/openai-wiki/miniconda3/bin/activate
no change     /home/openai-wiki/miniconda3/bin/deactivate
no change     /home/openai-wiki/miniconda3/etc/profile.d/conda.sh
no change     /home/openai-wiki/miniconda3/etc/fish/conf.d/conda.fish
no change     /home/openai-wiki/miniconda3/shell/condabin/Conda.psm1
no change     /home/openai-wiki/miniconda3/shell/condabin/conda-hook.ps1
no change     /home/openai-wiki/miniconda3/lib/python3.10/site-packages/xontrib/conda.xsh
no change     /home/openai-wiki/miniconda3/etc/profile.d/conda.csh
modified      /home/openai-wiki/.bashrc

==> For changes to take effect, close and re-open your current shell. <==

If you'd prefer that conda's base environment not be activated on startup,
   set the auto_activate_base parameter to false:

conda config --set auto_activate_base false

Thank you for installing Miniconda3!
openai-wiki@openai-wiki:~$
至此,我们已经安装完成了conda,那么如何知道是否安装成功了呢?
我们必须要重启Linux的命令行,然后输入conda命令即可验证是否安装成功。为了可以正常退出,我们直接在当前窗口内输入exit,退出Linux的终端。
exit
然后我们再次输入wsl,重新进入Linux系统。
wsl
此时我们再执行conda的命令来验证是否安装成功,命令如下。
conda
如果你已经安装成功,那么将会看到如下返回内容。
C:\Users\openA>wsl
(base) openai_wiki@openAI:/mnt/c/Users/openA$ conda
usage: conda [-h] [-V] command ...

conda is a tool for managing and deploying applications, environments and packages.

Options:

positional arguments:
  command
    clean             Remove unused packages and caches.
    compare           Compare packages between conda environments.
    config            Modify configuration values in .condarc. This is modeled after the git config command. Writes to
                      the user .condarc file (/home/openai_wiki/.condarc) by default. Use the --show-sources flag to
                      display all identified configuration locations on your computer.
    create            Create a new conda environment from a list of specified packages.
    info              Display information about current conda install.
    init              Initialize conda for shell interaction.
    install           Installs a list of packages into a specified conda environment.
    list              List installed packages in a conda environment.
    package           Low-level conda package utility. (EXPERIMENTAL)
    remove (uninstall)
                      Remove a list of packages from a specified conda environment. Use `--all` flag to remove all
                      packages and the environment itself.
    rename            Renames an existing environment.
    run               Run an executable in a conda environment.
    search            Search for packages and display associated information.The input is a MatchSpec, a query
                      language for conda packages. See examples below.
    update (upgrade)  Updates conda packages to the latest compatible version.
    notices           Retrieves latest channel notifications.

options:
  -h, --help          Show this help message and exit.
  -V, --version       Show the conda version number and exit.

conda commands available from other packages (legacy):
  build
  content-trust
  convert
  debug
  develop
  env
  index
  inspect
  metapackage
  pack
  render
  repo
  server
  skeleton
  token
  verify
(base) openai_wiki@openAI:/mnt/c/Users/openA$
如果你的回显不正确,那么可能代表你的安装出现了问题,建议根据此部分重新设置。
注意:如果你在安装时遇到困难,可以【点此查看】更详细的Linux系统安装Conda环境教程。
Linux中Conda的环境配置
执行如命令,将会在你的Linux系统中创建一个名为mmvc的Python虚拟环境,版本为3.9。
conda create -y -n mmvc python=3.9
等待片刻之后,基本就创建成功啦,我们可以执行以下命令,验证环境是否已经成功创建。
conda info -e
我们可以看到,该系统中所有已创建的环境都被列了出来。
基中base是Conda自带的默认基础环境,另一个mmvc是刚刚创建的环境。
(base) openai_wiki@openAI:/mnt/c/Users/openA$ conda info -e
# conda environments:
#
base                  *  /home/openai_wiki/anaconda3
mmvc                     /home/openai_wiki/anaconda3/envs/mmvc
但是我们可以看到base后面有一个*号,这代表当前我们处于名为base的环境,并不是我们刚刚创建的mmvc环境,我们需要执行如下命令切换至mmvc环境中。
conda activate mmvc
执行之后,我们可以看到以下内容,开头的base已经变更为mmvc,这代表我们已经切换成功啦。
(base) openai_wiki@openAI:/mnt/c/Users/openA$ conda activate mmvc
(mmvc) openai_wiki@openAI:/mnt/c/Users/openA$
注意:如果你在配置时遇到困难,可以【点此查看】更详细的Linux系统配置Conda环境教程。
Linux安装Git
我们在Linux系统中执行如下命令,即可自动安装Git。
sudo apt-get install git
执行完如上命令之后会提示你需要密码,如下所示,我们需要输入密码,输入过程中密码不可见,正常输入你当初设置的Linux系统密码即可。
(mmvc) openai_wiki@openAI:/mnt/c/Users/openA$ sudo apt-get install git
[sudo] password for openai_wiki:
下面是执行该命令之后的过程回显:
openai-wiki@openai-wiki:~$ sudo apt install git
正在读取软件包列表... 完成
正在分析软件包的依赖关系树... 完成
正在读取状态信息... 完成
将会同时安装下列软件:
  git-man liberror-perl
建议安装:
  git-daemon-run | git-daemon-sysvinit git-doc git-email git-gui gitk gitweb
  git-cvs git-mediawiki git-svn
下列【新】软件包将被安装:
  git git-man liberror-perl
升级了 0 个软件包,新安装了 3 个软件包,要卸载 0 个软件包,有 3 个软件包未被升级。
需要下载 4,673 kB 的归档。
解压缩后会消耗 23.9 MB 的额外空间。
您希望继续执行吗? [Y/n]
上面是提示我们是否继续执行安装,我们不需要输入任何内容,直接按下回车键即可。
获取:1 http://cn.archive.ubuntu.com/ubuntu lunar/main amd64 liberror-perl all 0.17029-2 [25.6 kB]
获取:2 http://cn.archive.ubuntu.com/ubuntu lunar-updates/main amd64 git-man all 1:2.39.2-1ubuntu1.1 [1,075 kB]
获取:3 http://cn.archive.ubuntu.com/ubuntu lunar-updates/main amd64 git amd64 1:2.39.2-1ubuntu1.1 [3,572 kB]
已下载 4,673 kB,耗时 6秒 (760 kB/s)
正在选中未选择的软件包 liberror-perl。
(正在读取数据库 ... 系统当前共安装有 169799 个文件和目录。)
准备解压 .../liberror-perl_0.17029-2_all.deb  ...
正在解压 liberror-perl (0.17029-2) ...
正在选中未选择的软件包 git-man。
准备解压 .../git-man_1%3a2.39.2-1ubuntu1.1_all.deb  ...
正在解压 git-man (1:2.39.2-1ubuntu1.1) ...
正在选中未选择的软件包 git。
准备解压 .../git_1%3a2.39.2-1ubuntu1.1_amd64.deb  ...
正在解压 git (1:2.39.2-1ubuntu1.1) ...
正在设置 liberror-perl (0.17029-2) ...
正在设置 git-man (1:2.39.2-1ubuntu1.1) ...
正在设置 git (1:2.39.2-1ubuntu1.1) ...
正在处理用于 man-db (2.11.2-1) 的触发器 ...
openai-wiki@openai-wiki:~$
至此,我们已经安装完成了Git,我们可以在终端内直接输入git即可验证安装是否成功。
注意:如果你在安装时遇到困难,可以【点此查看】更详细的Linux系统安装Git环境教程。
Linux中MMVC环境部署
我们需要先将此项目的存储库克隆到本地,执行如下命令。
git clone https://github.com/w-okada/voice-changer.git -b ver_1.2
执行此命令后,可能需要等待比较久,因为克隆的库比较大。
(mmvc) openai_wiki@openAI:/mnt/c/Users/openA$ git clone https://github.com/w-okada/voice-changer.git -b ver_1.2
Cloning into 'voice-changer'...
remote: Enumerating objects: 12680, done.
remote: Counting objects: 100% (2007/2007), done.
remote: Compressing objects: 100% (431/431), done.
remote: Total 12680 (delta 1578), reused 1916 (delta 1557), pack-reused 10673
Receiving objects: 100% (12680/12680), 152.02 MiB | 12.80 MiB/s, done.
Resolving deltas: 100% (8415/8415), done.
Note: switching to 'e824f89e8fac9d202d5ff72ebb13a4e1bf57b4d3'.

You are in 'detached HEAD' state. You can look around, make experimental
changes and commit them, and you can discard any commits you make in this
state without impacting any branches by switching back to a branch.

If you want to create a new branch to retain commits you create, you may
do so (now or later) by using -c with the switch command. Example:

  git switch -c <new-branch-name>

Or undo this operation with:

  git switch -

Turn off this advice by setting config variable advice.detachedHead to false

Updating files: 100% (1010/1010), done.
(mmvc) openai_wiki@openAI:/mnt/c/Users/openA$
当你看到如上内容,那代表我们已经成功将该项目拉取至本地,我们需要执行如下命令进入该库。
cd voice-changer
分别执行如下命令,将会根据项目的配置文件自动安装相关依赖。
pip install -U pip setuptools
pip install -r conda/requirements.txt
以上过程需要等待的时间可能非常久,取决于你的网速和魔法环境。
cd demo
执行如何代码,将会在Linux系统中启动VC项目。
python3 MMVCServerSIO.py
等待片刻,将会看到如下代码,这将代表我们已经成功运行啦。
(mmvc) openai_wiki@openAI:/mnt/c/Users/openA/voice-changer/demo$ python3 MMVCServerSIO.py
    Phase name:__main__
    PHASE1:__main__
Start MMVC SocketIO Server
    CONFIG:None, MODEL:None
    Internal_Port:8080
    protocol: HTTP
open http://<IP>:<PORT>/ with your browser.
    Phase name:__mp_main__
    PHASE2:__mp_main__
DEBUG:asyncio:Using selector: EpollSelector
    Phase name:MMVCServerSIO
    PHASE3:MMVCServerSIO
看到如上内容,这代表我们已经成功启动了该项目的相关服务,我们可以在浏览器中打开网址【http://localhost:8080】,将会看到如下内容。

我们直接点击Click to start按钮,浏览器将会跳转到如下界面。
使用教程
因为本站之前讲解过这个开源项目,使用方法都是差不多一致的,所以这里就不做赘述了。
关于此软件的使用教程,可以查看如下文章。
总结
只是部署方式不同,爱折腾的人可以看一下,也可以通过这篇文章学习一下如何使用WSL做为开源项目部署的教程,还是比较有必要的,毕竟不是所有项目都支持Windows。


评论 (0)