
CV_ORC-Text-Spotting|读光OCR-多场景文字识别
模型描述
- 文字识别,即给定一张文本图片,识别出图中所含文字并输出对应字符串。
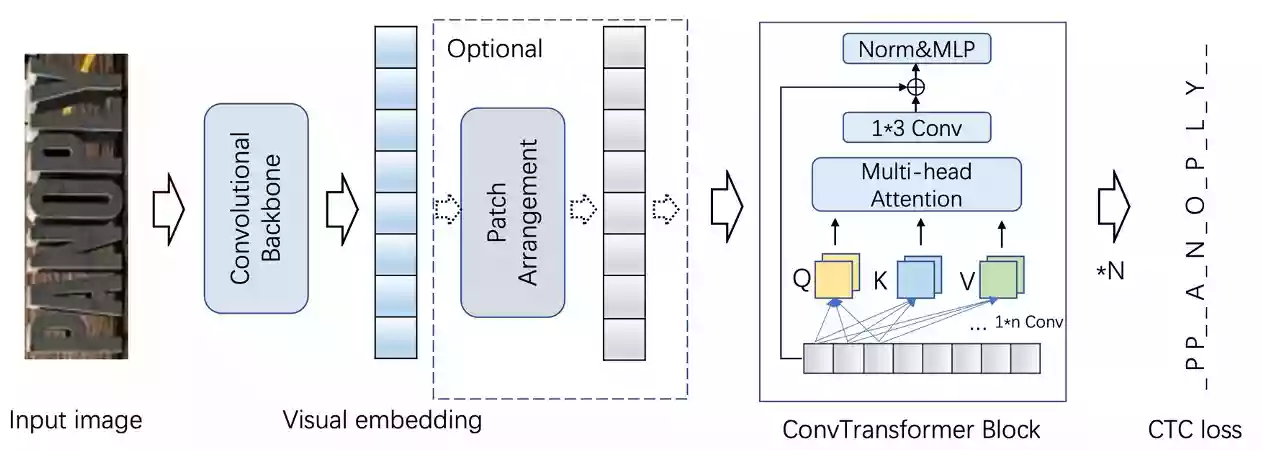
- 本模型主要包括三个主要部分,Convolutional Backbone提取图像视觉特征,ConvTransformer Blocks用于对视觉特征进行上下文建模,最后连接CTC loss进行识别解码以及网络梯度优化。识别模型结构如下图:
期望模型使用方式以及适用范围
本模型主要用于给输入图片输出图中文字内容,具体地,模型输出内容以字符串形式输出。用户可以自行尝试各种输入图片。具体调用方式请参考代码示例。
- 注:输入图片应为包含文字的单行文本图片。其它如多行文本图片、非文本图片等可能没有返回结果,此时表示模型的识别结果为空。
模型介绍
各场景文本识别模型:
- ConvNextViT-通用场景
- ConvNextViT-手写场景
- ConvNextViT-自然场景
- ConvNextViT-文档印刷场景
- CRNN-通用场景
各场景文本检测模型:
- SegLink++-通用场景行检测
- SegLink++-通用场景单词检测
- DBNet-通用场景行检测
整图OCR能力:
- 整图OCR-多场景
模型局限性以及可能的偏差
- 模型是在中英文数据集上训练的,在其他语言的数据上有可能产生一定偏差,请用户自行评测后决定如何使用。
- 当前版本在python3.7的CPU环境和单GPU环境测试通过,其他环境下可用性待测试。
训练数据及流程介绍
- 本文字识别模型训练数据集是收集数据以及合成数据,训练数据数量约1M。
- 本模型参数随机初始化,然后在训练数据集上进行训练,在32×300尺度下训练20个epoch。
部署教程
如果您是初学者,对于命令行不太理解,那么请按下键盘上的Win键+R键后,在弹出的新窗口内输入CMD并按下回车,打开CMD窗口,按顺序执行如下的每一条命令。
首先我们需要确认一个工作目录,用来存放cv_ocr-text-spotting的相关环境依赖文件。本站所选择的目录为D盘的根目录下openai.wiki文件夹,完整路径为:D:\openai.wiki\cv_ocr-text-spotting。
检测D盘是否在openai.wiki目录下有没有cv_ocr-text-spotting文件夹,没有则创建该文件夹。
if not exist D:\openai.wiki\cv_ocr-text-spotting mkdir D:\openai.wiki\cv_ocr-text-spotting
强制切换工作路径为D盘的openai.wiki\cv_ocr-text-spotting文件夹。
cd /d D:\openai.wiki\cv_ocr-text-spotting
为不影响电脑中的现有环境,请一定要安装Conda,如果您不知道什么是Conda,或者未安装过Conda,请参考如下文章,安装部署Conda之后再继续以下步骤。
在CMD中执行下面的命令行,创建Conda虚拟环境至该项目的目录中,方便日后重装系统也能够正常使用,无需重新部署环境。
conda create -p D:\openai.wiki\cv_ocr-text-spotting\ENV python=3.7
执行完成上面的命令之后,将会在CMD窗口中看到Proceed ([y]/n)?提示,我们直接按下回车即可。
初始化Conda环境,避免后续可能报错。
conda init cmd.exe
激活已创建的Conda环境,这样我们可以将我们后续所需要的所有环境依赖都安装至此环境下。
conda activate D:\openai.wiki\cv_ocr-text-spotting\ENV
执行如下命令,安装阿里达摩院相关依赖。
pip install modelscope
执行如下命令,安装torch依赖。
pip3 install torch torchvision torchaudio -i https://pypi.tuna.tsinghua.edu.cn/simple
执行如下命令,安装CV2依赖库。
pip install opencv-python
关于tensorflow的安装,支持CPU和GPU双版本,以下两行代码选择其中一个执行安装即可。
- 如果你想用CPU来计算,请复制第一行内容执行。
- 如果你想用GPU来计算,请复制第二行内容执行。
pip install --upgrade tensorflow==1.15
pip install --upgrade tensorflow-gpu==1.15
执行如下命令,安装tf_slim依赖库。
pip install tf_slim
执行如下命令,安装protobuf依赖库。
pip install --user protobuf==3.20.0
执行如下命令,安装pyclipper依赖库。
pip install pyclipper
执行如下命令,安装shapely依赖库。
pip install shapely
使用教程
推荐下载VS Code代码编辑器,然后在代码编辑器器内新建一个Python文件,粘贴如下代码,在代码编辑器的右下角选择Python环境为D:\openai.wiki\cv_ocr-text-spotting\ENV。
该模型官方并未给出示例,本站已经帮您写好了相关的代码,复制粘贴即可使用。
注意:请自行修改表格像名称和路径为您自己的表格图片名称,然后再执行,否则会报错。
模型调试:文本检测
from modelscope.pipelines import pipeline
from modelscope.utils.constant import Tasks
import cv2

class orc_detection():
    def __init__(self, orc_fun):
        if orc_fun == 'line':
            self.ocr_detection = pipeline(Tasks.ocr_detection, model='damo/cv_resnet18_ocr-detection-line-level_damo')
        elif orc_fun == 'word':
            self.ocr_detection = pipeline(Tasks.ocr_detection, model='damo/cv_resnet18_ocr-detection-line-level_damo')

    # 读取本地文件
    def ocr_file(self):
        img_path = IMG_File
        img = cv2.imread(img_path)
        result = self.ocr_detection(img)
        print(result)

    # 读取网络图片URL
    def ocr_url(self):
        result_url = self.ocr_detection(IMG_URL)
        print(result_url)

# 自定义配置
IMG_URL = 'https://openai.wiki/File/Text_Love.jpg'                 # 图片URL地址
IMG_File = 'D:/openai.wiki/cv_ocr-text-spotting/IMG.jpg'           # 本地文件路径
orc_Fun = 'word'        # line通用场景,word文档场景。
is_file = True          # True为文件模式,False为URL模式。

# 以下内容无需修改
orc_detection = orc_detection(orc_Fun)
if is_file:
    orc_detection.ocr_file()
else:
    orc_detection.ocr_url()
模型调试:文本识别
from modelscope.pipelines import pipeline
from modelscope.utils.constant import Tasks
import cv2

# 文本识别
class orc_detection():
    def __init__(self, orc_fun):
        if orc_fun == 'general':
            # 通用文本识别模型
            self.ocr_recognition = pipeline(Tasks.ocr_recognition, model='damo/cv_convnextTiny_ocr-recognition-general_damo')
        elif orc_fun == 'scene':
            # 自然场景文本识别模型
            self.ocr_recognition = pipeline(Tasks.ocr_recognition, model='damo/cv_convnextTiny_ocr-recognition-scene_damo')
        elif orc_fun == 'document':
            # 印刷文档文本识别模型
            self.ocr_recognition = pipeline(Tasks.ocr_recognition, model='damo/cv_convnextTiny_ocr-recognition-document_damo')
        elif orc_fun == 'handwritten':
            # 手写文本识别模型
            self.ocr_recognition = pipeline(Tasks.ocr_recognition, model='damo/cv_convnextTiny_ocr-recognition-handwritten_damo')

    # 读取本地文件
    def ocr_file(self):
        img_path = IMG_File
        img = cv2.imread(img_path)
        result = self.ocr_recognition(img)
        print(result)

    # 读取网络图片URL
    def ocr_url(self):
        result_url = self.ocr_recognition(IMG_URL)
        print(result_url)

# 自定义配置
IMG_URL = 'https://openai.wiki/File/Text_Love.jpg'                    # 图片URL地址
IMG_File = 'D:/openai.wiki/cv_ocr-text-spotting/IMG.jpg'              # 本地文件路径
orc_Fun = 'general'          # line通用场景,word文档场景。
is_file = False              # True为文件模式,False为URL模式。

# 以下内容无需修改
orc_detection = orc_detection(orc_Fun)
if is_file:
    orc_detection.ocr_file()
else:
    orc_detection.ocr_url()
模型调试:检测识别串联
有了上述的基础,我们串联文本检测和文本识别模型,以实现完整的OCR功能,输入下列代码。
from modelscope.pipelines import pipeline
from modelscope.utils.constant import Tasks
import numpy as np
import cv2
import math

# scripts for crop images
def crop_image(img, position):
    def distance(x1,y1,x2,y2):
        return math.sqrt(pow(x1 - x2, 2) + pow(y1 - y2, 2))
    position = position.tolist()
    for i in range(4):
        for j in range(i+1, 4):
            if(position[i][0] > position[j][0]):
                tmp = position[j]
                position[j] = position[i]
                position[i] = tmp
    if position[0][1] > position[1][1]:
        tmp = position[0]
        position[0] = position[1]
        position[1] = tmp

    if position[2][1] > position[3][1]:
        tmp = position[2]
        position[2] = position[3]
        position[3] = tmp

    x1, y1 = position[0][0], position[0][1]
    x2, y2 = position[2][0], position[2][1]
    x3, y3 = position[3][0], position[3][1]
    x4, y4 = position[1][0], position[1][1]

    corners = np.zeros((4,2), np.float32)
    corners[0] = [x1, y1]
    corners[1] = [x2, y2]
    corners[2] = [x4, y4]
    corners[3] = [x3, y3]

    img_width = distance((x1+x4)/2, (y1+y4)/2, (x2+x3)/2, (y2+y3)/2)
    img_height = distance((x1+x2)/2, (y1+y2)/2, (x4+x3)/2, (y4+y3)/2)

    corners_trans = np.zeros((4,2), np.float32)
    corners_trans[0] = [0, 0]
    corners_trans[1] = [img_width - 1, 0]
    corners_trans[2] = [0, img_height - 1]
    corners_trans[3] = [img_width - 1, img_height - 1]

    transform = cv2.getPerspectiveTransform(corners, corners_trans)
    dst = cv2.warpPerspective(img, transform, (int(img_width), int(img_height)))
    return dst

def order_point(coor):
    arr = np.array(coor).reshape([4, 2])
    sum_ = np.sum(arr, 0)
    centroid = sum_ / arr.shape[0]
    theta = np.arctan2(arr[:, 1] - centroid[1], arr[:, 0] - centroid[0])
    sort_points = arr[np.argsort(theta)]
    sort_points = sort_points.reshape([4, -1])
    if sort_points[0][0] > centroid[0]:
        sort_points = np.concatenate([sort_points[3:], sort_points[:3]])
    sort_points = sort_points.reshape([4, 2]).astype('float32')
    return sort_points

ocr_detection = pipeline(Tasks.ocr_detection, model='damo/cv_resnet18_ocr-detection-line-level_damo')
ocr_recognition = pipeline(Tasks.ocr_recognition, model='damo/cv_convnextTiny_ocr-recognition-general_damo')


# 自定义配置
img_path = 'D:/openai.wiki/cv_ocr-text-spotting/IMG.jpg'               # 本地文件路径
image_full = cv2.imread(img_path)
det_result = ocr_detection(image_full)
det_result = det_result['polygons']
for i in range(det_result.shape[0]):
    pts = order_point(det_result[i])
    image_crop = crop_image(image_full, pts)
    result = ocr_recognition(image_crop)
    print("box: %s" % ','.join([str(e) for e in list(pts.reshape(-1))]))
    print("text: %s" % result['text'])


评论 (0)